Dial In Your Espresso (And Actually Remember What Worked)
A beginner's guide to pulling great shots — and how PullPerfect keeps track of the journey.
Part 1: Espresso Fundamentals
What You'll Need
Before anything else: an espresso machine, a burr grinder, and a kitchen scale that reads to 0.1g. The scale is highly recommended for tracking yield — eyeballing volume is less reliable. I chose a scale off amazon that has an auto-timer feature and is this enough to sit under my cups. I also use a small short ramekin for pulling shots since I only have large mugs. Don't forget some rags for cleanup. Note that many consider grind size and consistency as the most important variable in a good pull and they recommend putting your money here.
The Four Numbers That Control Everything
Espresso is intimidating until you realize it comes down to four variables you can measure and adjust. Once you understand these, the mystery dissolves fast.
Grind Size — your primary lever. Finer grinds slow the water down and extract more. Coarser grinds speed it up and extract less. On most grinders you'll dial this in by feel until you learn what your machine likes. In PullPerfect it's tracked as a number from 0–100 so you can reproduce it exactly.
Dose — how many grams of coffee go into the portafilter. A standard double shot uses 18g. Lock this in early and leave it alone while you're dialing in. Changing dose and grind at the same time means you won't know which one fixed your shot.
Yield — how many grams of liquid espresso end up in the cup. This is not the same as volume — crema makes volume unreliable. Weigh it. The classic starting target for an 18g dose is 36g out: the 1:2 golden ratio that most specialty coffee training is built around.
Extraction Time — how long the shot runs from first drip to stop. Aim for 25–30 seconds. This is a consequence of your grind, not something you control directly — but it tells you whether you're in the right ballpark.
The golden ratio: 18g in → 36g out in 25–30 seconds. That's the baseline almost every barista starts from. Note that for water, 1 ml = 1 g.
Only Change One Thing at a Time
This is the single most important rule in dialing in. If you adjust grind and dose between shots, you won't know which change improved or worsened the taste. Change one variable, pull a shot, taste it, decide your next move.
Grind size is almost always the right first adjustment. Yield is second. Dose is rarely the issue unless you're significantly under- or over-filling your basket.
Reading Your Shot
Your palate is the most important instrument you own. Here's what each flavor outcome tells you:
| Taste | Body | What It Means | What to Try |
|---|---|---|---|
| Sour | Any | Under-extracted — water moved too fast | Grind finer, or extend yield by 2–4g |
| Bitter | Any | Over-extracted — water moved too slow | Grind coarser, or shorten yield by 2–4g |
| Balanced | Watery | Good extraction, not enough body | Check your dose, or grind slightly finer |
| Balanced | Muddy | Good taste but something's off — often channeling | Distribute grounds more evenly before tamping |
| Balanced | Good | You're done. Write it down. | Nothing — repeat this shot |
| Sour | Watery | Under-extracted across the board | Grind finer and increase yield |
| Bitter | Muddy | Over-extracted across the board | Grind coarser and decrease yield |
Watery body means the shot is thin and hollow — the coffee didn't have enough resistance to develop body. Muddy usually means water found an easy path through the puck (channeling) and pulled uneven extraction. Good body is full without being heavy.
What does sour actually taste like? Think lemon juice, unripe green apple, or a sharp vinegar bite — a brightness that's edgy rather than pleasant. In espresso it shows as a thin, puckering acidity that hits the sides of your tongue and fades fast, with little sweetness behind it. If your first instinct is to reach for sugar, the shot is probably sour.
What about bitter? Think the inside of a walnut shell, unsweetened dark chocolate, or espresso left sitting in the cup for five minutes — a harsh, drying sensation at the back of the throat that lingers and crowds out everything else. A little bitterness is normal and welcome in espresso; a lot of it means over-extraction.
A balanced shot has both in proportion: a bright, pleasant acidity up front, sweetness in the middle, a clean finish. You'll know it when you taste it — it's the one where you don't want to put the cup down.
Before You Pull: Puck Preparation
Even with perfect numbers on paper, inconsistent puck prep produces inconsistent shots. A quick checklist before each pull:
- Dose into a clean, dry basket
- Distribute the grounds evenly — tap the portafilter gently, or use a finger to level the surface before tamping
- Tamp with firm, even downward pressure; keep the tamp level (consistency matters more than force)
- Check the basket rim is clean, then lock in and pull immediately
Channeling — where water finds a shortcut through the puck instead of flowing evenly — is the main cause of shots that taste both sour and bitter at the same time. Even prep prevents most of it.
Go deeper: Scott Rao's The Professional Barista's Handbook and James Hoffmann's YouTube channel are the two good resources for puck prep technique. Many also consider a WDT tool, screens, dispenser and other tools essential to prevent channeling.
Your Starter Recipe
If you're brand new and don't know where to begin, start here:
| Variable | Value |
|---|---|
| Grind | Find the setting that produces a 25–30s shot |
| Dose | 18g |
| Yield | 36g |
| Time | 28s (target) |
For medium roasts, this is almost universally a reasonable starting point. Light roasts often want more yield (36–45g) and a bit more time. Dark roasts often want less yield (30–32g) and a faster pull.
From this baseline, you will taste the shot and let the flavor guide your next adjustment. More on this below.
Part 2: PullPerfect Walkthrough
PullPerfect is a mobile-first espresso tracking app designed around one idea: the dial-in loop. You pull a shot, taste it, get guidance on what to adjust, and repeat until you hit balanced extraction. Your settings get saved to your bean profile so every future pull starts from a known-good baseline.
Here's how a typical session looks, step by step.
1. The Home Screen
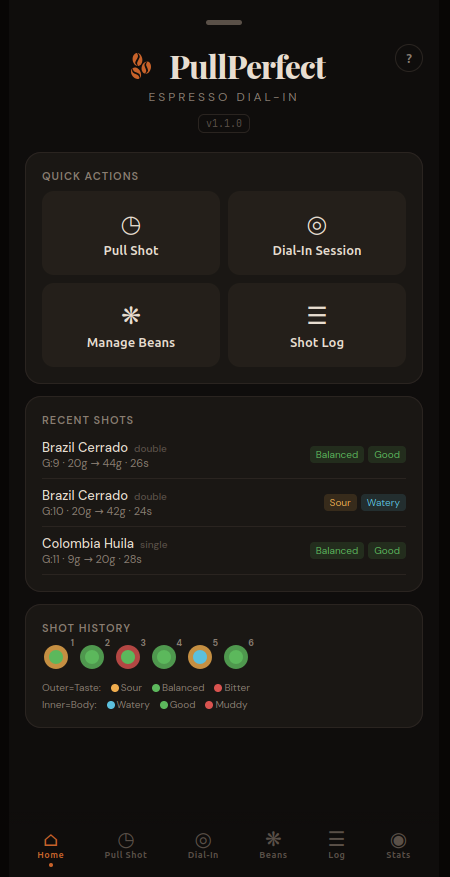
When you open PullPerfect, you land on the Home tab. The Quick Actions grid is your launchpad. Recent Shots shows your last three pulls at a glance — bean name, type badge, grind/dose/yield/time, and taste and body indicators color-coded green (balanced/good), yellow (sour), or red (bitter/muddy).
At the bottom, Shot Dots is a visual grid of every logged shot — each one rendered as a small circle with an outer ring (taste) and inner dot (body). Glance at it and you can immediately see whether your last few bags trended sour, bitter, or balanced.
Tip: Tap the ? button in the top right of any tab for a built-in help guide to that section — it explains every field and button without leaving the app.
2. Setting Up a Bean
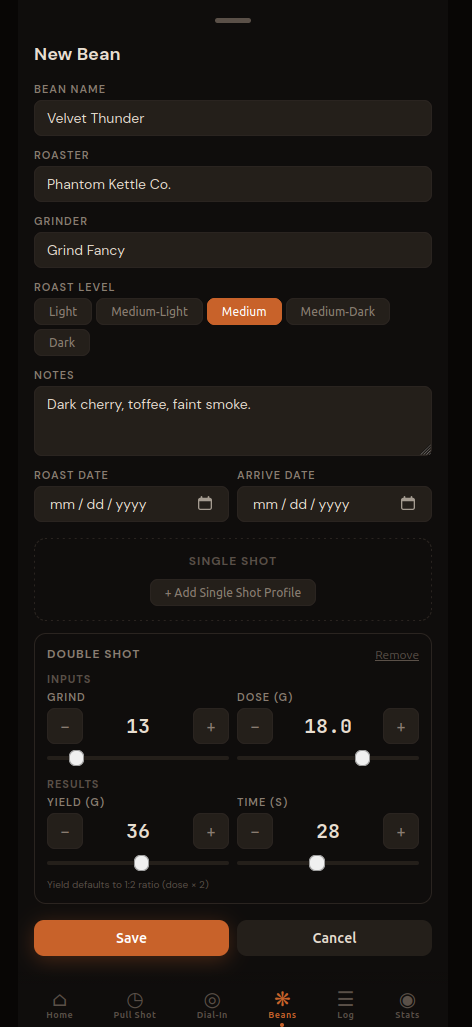
Tap Manage Beans from Home (or the Beans tab in the nav). Tap + Add Bean in the top right.
Fill in the name, roaster, roast level, and your grinder. Add tasting notes if you have them from the bag — they're useful context when you're dialing in and the flavor doesn't match what you expected. (The bean name field has autocomplete that remembers your past beans, handy once you're on your third bag of the same roast.)
Then add a Double Shot Profile. For a new bag where you're not sure yet, the standard starting point is a good bet:
- Grind: 13 (adjust to whatever produces a 25–30s shot on your setup)
- Dose: 18g
- Yield: 36g
- Time: 28s
When you change dose on a new bean, yield auto-fills to double (the 1:2 golden ratio). Tap Save.
3. The Saved Bean Card
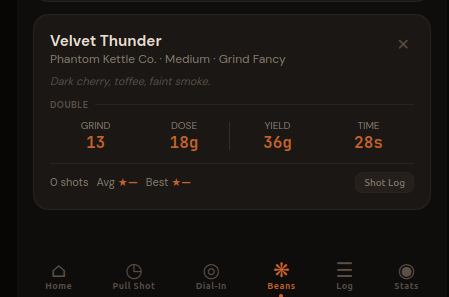
After saving, the bean card shows your profile at a glance. The 2×2 grid — G (grind), D (dose), Y (yield), T (time) — is the shorthand you'll reference constantly. Shot stats (shot count, average rating, best rating) appear once you start logging.
4. Starting a Dial-In Session
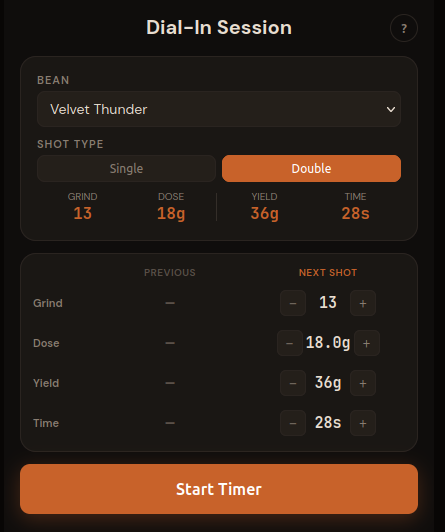 Tap the **Dial-In** tab. Select your bean and shot type (Double). The AdjustmentEditor appears with two columns: **PREVIOUS** (empty on shot #1) and **NEXT SHOT** (pre-filled from your bean profile). Adjust the values if needed, then tap **Start Timer**.
The Dial-In tab is designed for iterative sessions. You pull, rate, get guidance, then plan your next shot — all without leaving the tab. Your session shots are listed at the bottom so you can see the trend.
5. The Pull
Before tapping Start Timer, get everything ready:
- Machine is fully warmed up — most home machines need 15–20 minutes, some with a PID can be ready faster, but don't pull on a cold machine
- Portafilter is dosed, distributed, and tamped (see Before You Pull above)
- Scale is on the drip tray, zeroed, with your cup placed on it
- You're positioned to lock the portafilter, start the machine, and tap the app in quick succession
Tap Start Timer the moment the machine starts and espresso begins moving toward the cup. The app is timing your extraction from that point, so try to be consistent — a second or two either way won't ruin your records, but starting the timer mid-pull will skew your time data. Being consistent is the most important thing.
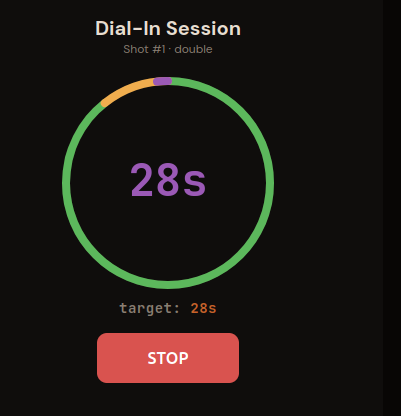
The time is shown and the circular timer fills as the shot runs. The circle is sized to the time entered into the Next Shot previously. The color tells you where you are relative to your target:
- Green — extraction is building, you're on track
- Yellow — within 3 seconds of target, watch the scale
- Purple flash — you hit your target time exactly
- Red + "+Ns" — you've gone over; stop if yield is there, or let it run if flow is still fast and thin
Watch your scale, not just the timer. Stop the machine — and tap STOP in the app — when your yield hits the target weight (36g in this case). Most setups have a little drip-through after you cut the flow, so stop the machine 1–2g early and let it drip to target. When yield and time both land close to target on the same shot, you're (probably) in a good place.
6. Rating the Shot and Getting Guidance
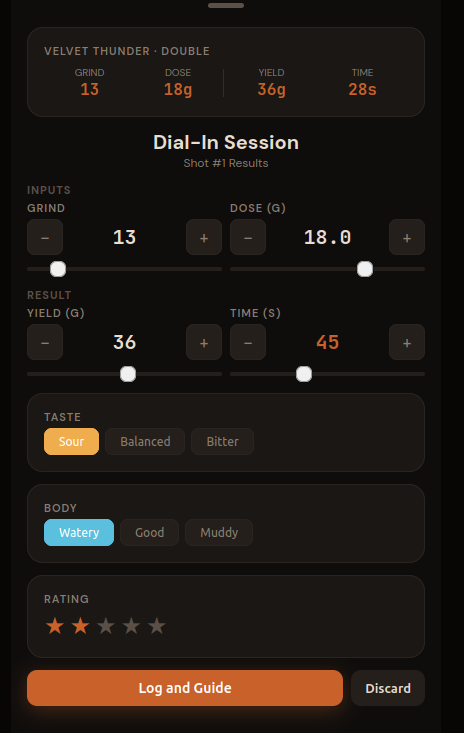
After stopping, the Results page appears. Note that the actual time you click stop is corded under time. Verify your actual dose, yield, and time - adjust as needed. Then select your Taste and Body ratings.
Once you click Log and Guide you will be returned to the Plan page. If needed you can Discard the data and it will not be saved and you can try again.
Add a star rating (1–5) and tap Log and Guide.
7. Adjusting for Shot #2
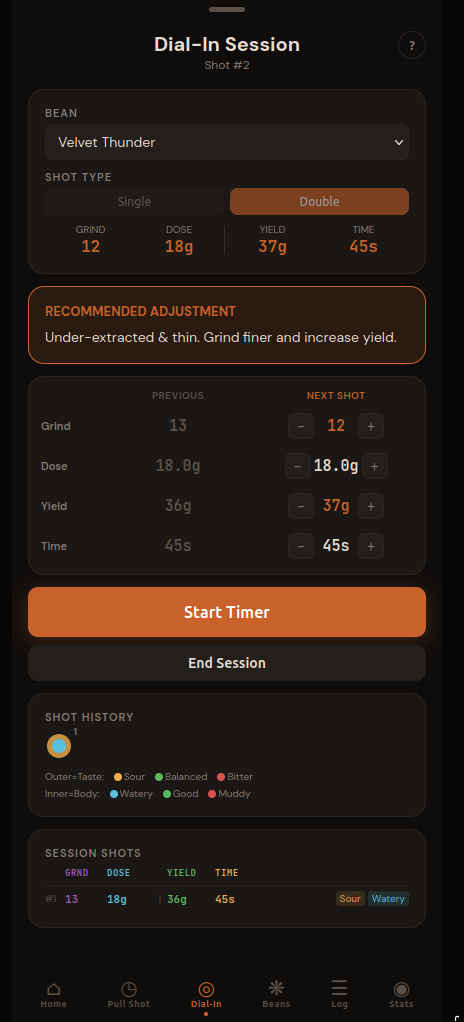
Back on the Plan page, you'll first notice the Guidance Card appears (Recommended Adjustment). It maps your taste + body combination to a specific recommendation. In this case, Sour + Watery means under-extraction across the board — the remedy is to grind finer and extend the yield.
You'll see the PREVIOUS column now filled with shot #1's values. The NEXT SHOT column starts from the same values so you can make targeted adjustments. Changed values highlight in orange so it's obvious what's different.
Following the guidance: The app adjusted grind finer (13 → 12) and nudge yield up (36g → 38g). If you want to do something different, just change the values.
You may have noticed that the app recommended 2 changes yet above it said to only change 1 thing at a time. This app is a work in progress and i'll have to decide how to handle this. Stay tuned.
Load and ready your equipment and click Tap Start Timer and pull shot #2.
What's Happening?
There are four levers at your disposal. Here's what each one does and when to reach for it:
Grind Size is almost always the first move. Making it finer increases resistance in the puck, slows the water down, and extracts more — fixing sourness and often adding body. Going coarser does the opposite. The tradeoff: grind changes also shift your extraction time, so expect the clock to move when you change it. Most experienced home baristas adjust grind in small steps (1 click, or 1 unit in PullPerfect) and taste before changing anything else.
Yield is the second lever. Pulling more liquid (higher yield) extends extraction without changing your grind — good if your timing is already where you want it but the shot still tastes sour. Pulling less (lower yield) shortens it, useful for bitterness. Yield adjustments of 2–4g are typical; larger jumps can mask the problem rather than fix it. Some baristas prefer to fix sourness with yield before touching grind, especially on machines where grind changes are hard to reproduce precisely.
Dose is the one most beginners change too often. In reality, once you've settled on a dose for a basket size, leave it alone during dial-in. That said: if you're consistently getting watery body despite grind and yield adjustments, a small dose increase (0.5–1g) can improve body by adding more coffee mass.
Temperature is a real variable that most home machines don't expose directly. If yours has a PID or temperature setting: lower temperatures slow extraction (useful for bitterness), higher temperatures speed it up (useful for sourness). For most home setups, consistent temperature matters more than the exact number — let the machine fully warm up before every session.
How PullPerfect guides the decision: Rather than leaving you to weigh all of this after each shot, PullPerfect maps your taste + body combination to a specific recommendation in the Guidance Card. Each of the 9 possible taste/body combinations (sour/balanced/bitter × watery/good/muddy) has a pre-set recommendation that points you at the highest-leverage adjustment for that result. You don't have to think through the logic every time — rate the shot, read the card, make the change.
A quick reference for what the guidance will generally tell you:
| If your shot is… | Primary recommendation |
|---|---|
| Sour + Watery | Grind finer, increase yield |
| Sour + Good body | Grind finer |
| Sour + Muddy | Grind finer, improve puck prep |
| Balanced + Watery | Grind slightly finer or increase dose |
| Balanced + Good | You're done — save it |
| Balanced + Muddy | Improve puck distribution/tamp |
| Bitter + Watery | Grind coarser, check dose |
| Bitter + Good body | Grind coarser |
| Bitter + Muddy | Grind coarser, decrease yield |
Dig Deeper — The Extraction Grid -
The table above is a simplified version of the classic espresso extraction matrix that barista trainers have used for decades. The full 3×3 grid, with taste on one axis and body on the other, is one of the most useful visual tools in espresso.
Repeat steps 4–7 — plan your next shot, pull, rate, get guidance, adjust — until you hit Balanced + Good. Most beans dial in within 2–4 shots. A particularly tricky grinder or a very light roast might take more. The session shots listed at the bottom of the Dial-In tab, and the trend chart that appears after two shots, help you see whether you're converging or drifting.
8. Dialed In
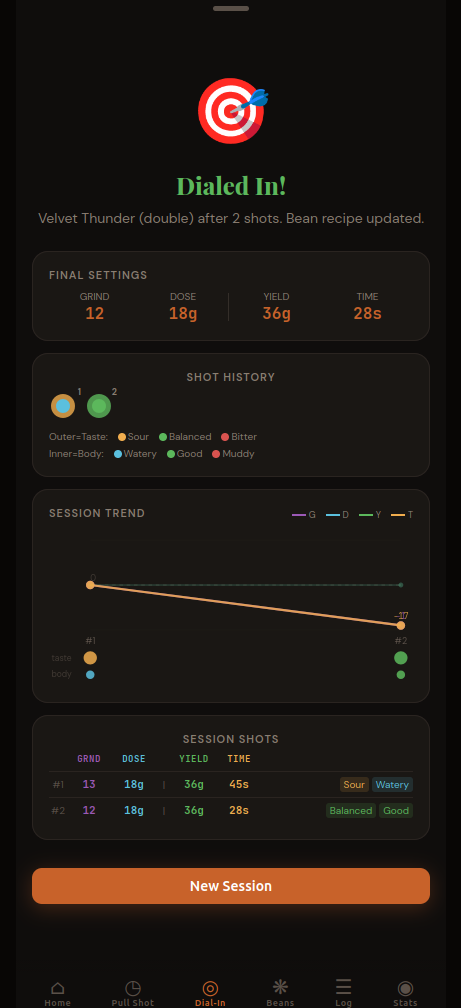
When you reach a Balanced taste and Good body, PullPerfect declares the session complete. The 🎯 Dialed In screen shows your final settings, the session shot log, and a trend chart showing how each variable moved across shots.
Your bean profile is automatically updated with the dialed-in values. Every future Pull Shot with this bean will start from these numbers.
9. Daily Pulls with the Timer Tab
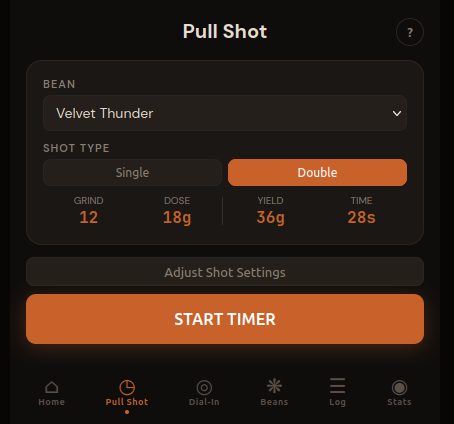
Once a bean is dialed in, switch to the Pull Shot tab for your daily pulls. Select your bean, verify the settings match what you actually ground, and hit START TIMER. After the shot you have two choices: Log Only (saves the shot to your history) or Update Bean (saves the shot and updates your bean profile with any tweaked values — useful if you made a adjustment and want to use them next time). Tap ✕ to discard without logging.
The "Adjust Shot Settings" toggle lets you tweak without losing your saved profile — useful when you've let beans rest a few more days and want to explore a half-step.
10. The Shot Log

The Log tab is your full history. Filter by taste, body, type, rating, or bean. Multi-select to delete experimental shots. Export to CSV if you want to analyze in a spreadsheet.
The date and time on each card let you correlate shots with real-world variables — a fresh bag vs. one that's been open two weeks, morning vs. afternoon machine warm-up, etc.
11. Stats at a Glance
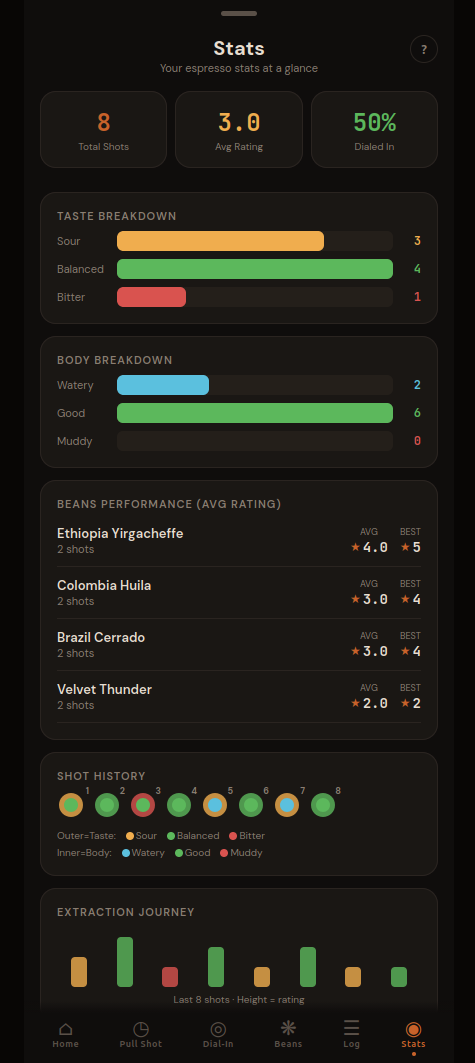
The Stats tab gives you a quick read on your overall extraction success rate. The Dialed In % is the share of Balanced + Good shots — your north star metric. The taste and body breakdown charts show whether you're consistently running sour (grind needs to go finer) or bitter (coarser) across all your beans.
The Extraction Journey at the bottom plots your last 20 shots as bars: green when you hit balanced + good, colored by taste otherwise. A good dial-in session shows a clear trend toward green.
A Few More Tips
Bean freshness matters. Beans roasted in the last 4–14 days are generally in their sweet spot — fresh enough to have good flavor, rested enough that the CO₂ from roasting has mostly off-gassed (excess CO₂ causes channeling and inconsistent extraction). Most specialty roasters print a roast date on the bag; PullPerfect's bean card has a roast date field for exactly this reason.
Single vs. double. PullPerfect tracks separate profiles for single (7g/14g) and double (18g/36g) shots. If you pull both, set up both profiles — the grind size that works for your double may need a click or two of adjustment for a single.
Don't throw away your bad shots. Log them, rate them low, and let the Stats tab accumulate. After a few bags you'll start to see patterns — whether you consistently run sour on new bags, or whether your Friday morning shots are always worse than your weekend ones. That's the data that actually helps you improve.
Wrapping Up
Espresso dial-in is a skill, not a formula. The variables interact, your palate adapts, and each bag of beans is slightly different. The goal isn't to find one perfect number — it's to build a feedback loop where you pull, taste, adjust, and record.
PullPerfect is built around that loop. Your bean profiles store what worked. Your log captures what you tried. Your stats show where you tend to drift. The more shots you track, the faster you'll dial in your next bag.
PullPerfect is a free, espresso tracking app. No account required, data stays on your device.