Dial In Your Espresso (And Actually Remember What Worked)
A beginner's guide to pulling great shots — and how PullPerfect keeps track of the journey.
EXPERIMENTAL Work In Progress!
Use at your own risk. When in doubt always follow your manual or consult professionals. If you do, please use the contact form on the site and provide comments.
Part 1: Espresso Fundamentals
If you already know what you are doing and have your equipment, skip down to Part 2.
What You'll Need
- espresso machine
- if you are here you probably need to go to a buying guide and join forums. Do you want fully automatic or full control? How fast do you want it to heat up? Lots of considerations.
- burr grinder
- Note that many consider consistency in grind size as the most important variable in a good pull. They recommend a fine setting and tend to want more grind sizes (>50) with 100 steps being preferred. Some also like the machines that allow for going between the marks for ultra-fine tuning. Though, many report good success with less expensive 75 steps options. I'd ask AI to help you choose.
- Coffee
- You might consider using one of the espresso cans (Cafe bustelo etc) or the freshest whole-beans you can find from the grocery store if you are brand new to the grinder and machine and espresso and run that through first. When you've done your best with that step up to a fresh ground expensive stuff and be amazed. Otherwise get something as freshly roasted as possible. 1-2 weeks - 6 weeks from roast date is a optimal. Medium-Dark roast is traditional espresso and perhaps a little easier. Medium is well balanced and bit richer in flavor. Highly recommend you find a local roaster or get freshly roasted shipped online. Look for "roasted on" dates not a "best before" date.
- kitchen scale - thin & precision to 0.1g.
- The scale is highly recommended for tracking yield — eyeballing volume is less reliable. A timer feature is highly preferred. Auto-timer option is nice. The scale will go under your cup to measure yield (output) weight when pulling espresso shots so keep it thinner and small enough to fit your cups. The yield tells you when to stop more reliably.
- Tamp
- Any tamp will do but when you are learning there are so many variables and tamping pressure is yet another dimension to worry about. I preferred to get a 30lb sprint loaded tamper with "click feedback" from amazon. The cheaper models were hard to verify so I went with a more name brand here which came with 3 springs.
- WDT Tool
- Not strictly required but recommended and they are not expensive. Just about any will work. You are using this to break up clumps which form when you grind fine. Clumps cause channels (air gaps) which allow the water to avoid going through the coffee and you get less extraction.
- Dosing Funnel
- Not required. Quality of life improvement. They go on top of the basket so you do not get grounds everywhere.
- Distributor
- Not required. Though I think it helps bring a bit of consistency to height and leveling that I like. If you find yourself struggling with the dosing funnel and tamping consider it.
- Dimatisse (small/short) cups
- You need something to pull espresso into. Short enough to fit. 2.5-3oz cups fits most straight espresso pull ratios with nothing else added (e.g. milk). It needs to sit under the spout and on top of the scale. I use ramekins so if you have something already this is optional. Consider material (prefer thick Ceramic or dual wall borosilicate glass from my research) to maintain heat.
- Bottomless Portafilter
- Optional. This is essentially a portafilter without the spout and the entire bottom is wide open. You can look at how the shot is coming out of the filter basket to determine quality or issues easier. Some say it maintains the formed crema better than the spout.
The Four Numbers That Control Everything
Espresso is intimidating until you realize it comes down to four variables you can measure and adjust. Once you understand these, the mystery dissolves fast.
The Inputs:
Grind Size — your primary lever. Finer grinds slow the water down and extract more. Coarser grinds speed it up and extract less. On most grinders you'll dial this in by feel until you learn what your machine likes. In PullPerfect it's tracked as a number from 0–100 so you can reproduce it exactly. Many say this is the most important variable. It can even vary from bean to bean and as they age or humidity changes. Hopefully, the app will help.
Dose — how many grams of coffee go into the portafilter. A standard double shot uses 18g. Lock this in early and leave it alone while you're dialing in. Changing dose and grind at the same time means you won't know which one fixed your shot.
The Outputs
Yield — how many grams of liquid espresso end up in the cup. This is not the same as volume — crema makes volume unreliable. Weigh it. The classic starting target for an 18g dose is 36g out: the 1:2 golden ratio that most specialty coffee training is built around.
Extraction Time — how long the shot runs from first drip to stop. Aim for 25–30 seconds. This is a consequence of your grind, not something you control directly — but it tells you whether you're in the right ballpark.
The golden ratio: 18g in → 36g out in 25–30 seconds. That's the baseline almost every barista starts from. Note that for water, 1 ml = 1 g.
There are many ways to do this but we start by roughing in the grind and dose. We stop the timer when we get the desired 1:2 ratio yield. If it is in the golden range we are in the ballpark. We usually have a formed "puck" and crema. This might be enough for many of you. The app will help you rough-in or go through a full taste dial-in session.
How PullPerfect guides the decision: Rather than leaving you to weigh all of this after each shot, PullPerfect maps your taste + body combination to a specific recommendation in the Guidance Card. Each of the 9 possible taste/body combinations (sour/balanced/bitter × watery/good/muddy) has a pre-set recommendation that points you at the highest-leverage adjustment for that result. You don't have to think through the logic every time — rate the shot, read the card, make the change.
A quick reference for what the guidance will generally tell you:
| If your shot is… | Primary recommendation |
|---|---|
| Sour + Watery | Grind finer, increase yield |
| Sour + Good body | Grind finer |
| Sour + Muddy | Grind finer, improve puck prep |
| Balanced + Watery | Grind slightly finer or increase dose |
| Balanced + Good | You're done — save it |
| Balanced + Muddy | Improve puck distribution/tamp |
| Bitter + Watery | Grind coarser, check dose |
| Bitter + Good body | Grind coarser |
| Bitter + Muddy | Grind coarser, decrease yield |
Dig Deeper — The Extraction Grid -
The table above is a simplified version of the classic espresso extraction matrix that barista trainers have used for decades. The full 3×3 grid, with taste on one axis and body on the other, is one of the most useful visual tools in espresso.
Okay, maybe it's still intimidating. The app will help.
Only Change One Thing at a Time
This is the single most important rule in dialing in. If you adjust grind and dose between shots, you won't know which change improved or worsened the taste. Change one variable, pull a shot, taste it, decide your next move.
Grind size is almost always the right first adjustment. However, Grind and Dose together define how full your basket is. So we kind of have to rough them in together at first then we move on to a dial-in taste session only changing 1 thing at a time.
Before You Pull: Puck Preparation
The grounds of coffee left in the basket after water has passed through them will form a puck (Like hockey) when it was well-formed with sufficient dose and good tamp pressure. Maintaining consistency when preparing pucks will help minimize issues that cause problems when troubleshooting.
- Dose into a clean, dry basket.
- WDT Tool to break up clumps and have uniform fine grounds to preent channels
- Distribute the grounds evenly — tap the portafilter gently, or use a finger to level the surface before tamping
- Tamp with firm, even downward pressure; keep the tamp level (consistency matters more than force)
Channeling — where water finds a shortcut through the puck instead of flowing evenly — is the main cause of shots that taste both sour and bitter at the same time. Even prep prevents most of it.
Go deeper: Scott Rao's The Professional Barista's Handbook and James Hoffmann's YouTube channel are the two good resources for puck prep technique. Many also consider a WDT tool, screens, dispenser and other tools essential to prevent channeling.
Starter Recipe
The app will help us dial this in, but we want something like this:
| Variable | Value |
|---|---|
| Basket | Double Shot Single Walled |
| Grind | This will vary per machine. Check the manual for "fine" setting. You want something like powdered sugar and not Turkish (ultra-fine). Maybe start in the middle of the "fine" range. |
| Dose | # ESTIMATE. Check basket and manual, See below on Sizing your Dose. Estimate 14-20g=~17g |
| Yield | Dose x 2 =Desired yield. ( 1:2 ratio) 17g coffee = 24g yield 18g=36g yield. 1ml =~ 1g |
| Time | 25-30s (target) |
For medium roasts, this is almost universally a reasonable starting point. Light roasts often want more yield (36–45g) and a bit more time. Dark roasts often want less yield (30–32g) and a faster pull.
Sizing your Dose
This one is a bit of an under-discussed topic IMO. Instructions just say to look at your basket or manual for size. They say things like 14-20g (for double) or just 18g. But these are rough estimates and they change based on grind size. When we dig deeper we read things like "leave 1-2mm below the water head screen" (inside the machine). But how do we know that? If you are lucky enough that the top of the portafilter basket is even with the bottom of the screen in the machine we can simply measure from the top of the basket. If that is not true you have to try to figure out the distance. I have 3 methods for you to consider. All of these work only if you have good puck prep:
- This only works if you have good prep mind you. Start on the LOW side (e.g. 14g in the example) and run a shot. if it is watery keep going. Add maybe 0.5g and try again. Once a nice puck forms stop. But if you every see marks on the top of your coffee or it is hard to insert you have gone too far. Measure your depth from the top of the basket and figure out how much coffee to add to drop that by 1.5-2mm. If you measure your basket and hit tare on the scale then remeasure after you know your gram weight for future on that grind level. Hopefully this works for all coffee since it is with the grind size. At least for this roughing phase.
- The "Razor". Breville makes a little tool called the razor that actually makes this quite easy. Essentially you weight and tare (zero) your basket before starting. Add a sufficient dose to fill the basket a bit over full (maybe go 18-19g from the example) and tamp as usual. We use the razor to scrape off the top of extra height and toss the removed grounds. Then we reweigh the baster to get the dose. Easy Peasy assuming that is the height you want. If you want to add something like a screen on top, you cound use the end of calipers to measure the height from the top of the basket and adjust the dose a little smaller and see how much it drops.
- The Coin Trick. WARNING: You could damage your machine. Go slow and do this at your own risk. Consider 3D printing a soft coin instead. (Someone have a link?) The idea here is that we need a way to find the gap size desired. If we get a coin that is about 1.5-2mm thick we can use that to look for an indentation in the coffee when it touches the screen in the water head. With too much force you may damage your machine. So you have to make tiny adjustment and sneak up on it. Start with a dose on the low side (E.g. 14G) and keep adding a little bit at a time (0.2-0.3g?) and tamp and put the coin on top and insert into the machine. When you see the minutest mark you stop and measure the basket again to get the difference from before and you know your dose in gram weight. You might consider putting a paper coffee filter on top of the coin touching the machine for a little cushion.
The main idea here is to determine some way to determine your dose size as grind size changes for consistency over just straight guessing a dose weight and living with results. Though there is an argument to be made for the dose weight BEING the consistency as many guides seems to suggest. I worry that is changing the height of the grounds the water must pass through and hence changing the watery/muddy characteristic. I'll be doing #2 or #3 for now and see hwo this goes.
This is just a starting point.
Part 2: PullPerfect Quickstart
PullPerfect is a mobile-first espresso tracking app designed around one idea: the dial-in loop. You pull a shot, taste it, get guidance on what to adjust, and repeat until you hit balanced extraction. Your settings get saved to your bean profile so every future pull starts from a known-good baseline.
Here's how a typical session looks, step by step. We will use a double shot in a single walled filter basket.
1. The Home Screen
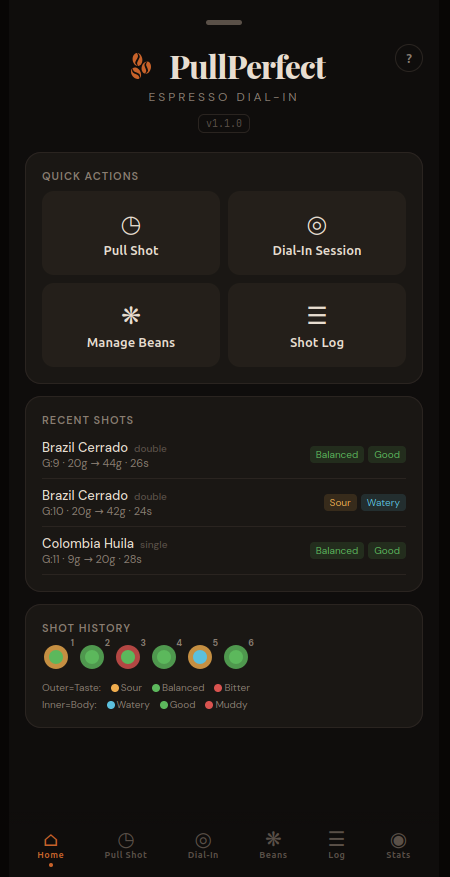
When you open PullPerfect, you land on the Home tab. The Quick Actions grid is your launchpad. Recent Shots shows your last three pulls at a glance — bean name, type badge, grind/dose/yield/time, and taste and body indicators color-coded green (balanced/good), yellow (sour), or red (bitter/muddy).
At the bottom, Shot Dots is a visual grid of every logged shot — each one rendered as a small circle with an outer ring (taste) and inner dot (body). Glance at it and you can immediately see whether your last few bags trended sour, bitter, or balanced.
Tip: Tap the ? button in the top right of any tab for a built-in help guide to that section — it explains every field and button without leaving the app.
2. Grind & Dose
With a new bean or grinder we can rough-in quickly on the Grind & Dose page. Click on the Dial-In tab, and the first page is Grind & Dose — it's designed to get you in the 25–30 second extraction window before taste-based feedback kicks in.
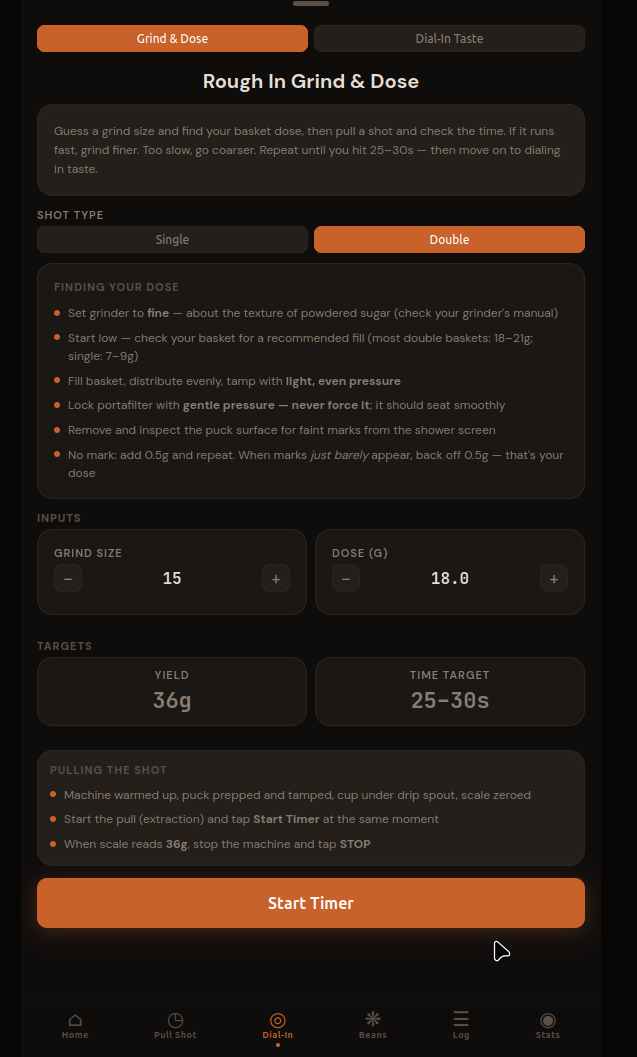
The workflow:
- Open the Dial-In tab (it opens here by default)
- Select your shot type (Single or Double)
- Set a starting Grind and Dose — the defaults are a sensible starting point but use the values from Part 1 or your manual.
- Enter your grind size chosen in Step 1 (consult your manual for Fine).
- Enter your chosed dose in Grams. See "sizing your dose" above for more info if needed.
- Prepare to Start Timer - Machine warmed, puck prepped and tamped - Scale zeroed with cup under drip spout - Lock portafilter and start machine the moment you tap Start Timer
- Start Timer
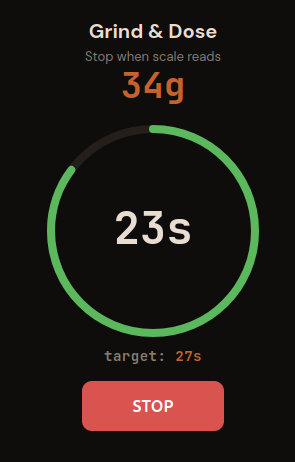
- Stop Timer When the scale reads your target yield (e.g., 36g for an 18g dose)
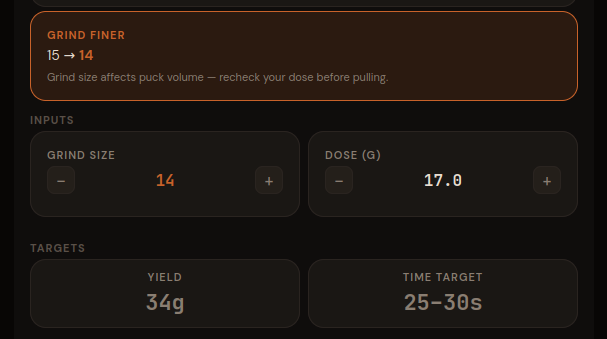
- You'll see your extraction time and analysis:
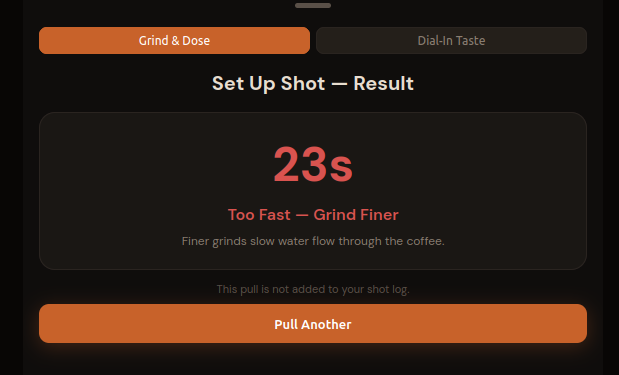
- Less than 25 seconds: Shot came out too fast — grind finer for the next pull
- 25–30 seconds: In range! Ready to start dial-in with taste feedback
- More than 30 seconds: Shot came out too slow — grind coarser for the next pull
- The app suggests the next grind automatically. Tap Pull Another to iterate until you're in the 25–30s window. Notice the callout box with the recommended change and the input value for grind has changed automatically and highlighted in Orange.
 Repeat this process until you get "in Range"
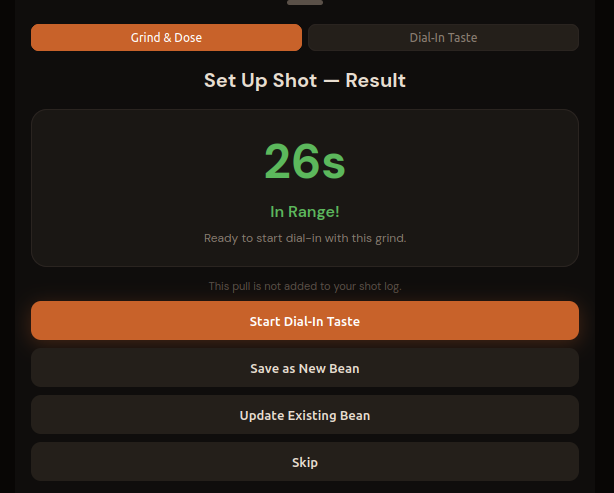
- Once in range, tap Save as New Bean — the app creates a new bean with this grind/dose and automatically selects it.
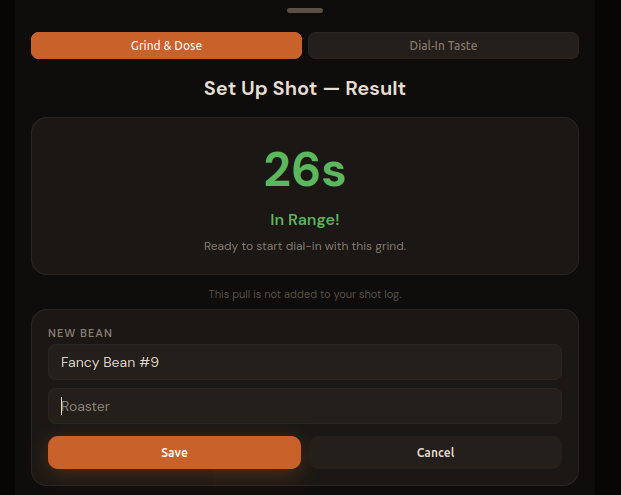 Enter the bean **Name** and optionally **Roaster** and click **Save**.
Note: Grind & Dose pulls are not logged to your shot history — they're calibration data. Once you save the bean, you'll move to taste-based dial-in.
3. Dial-In Taste Session
Once you've roughed in grind and dose, it's time to dial in taste.
3.1 Starting the Session
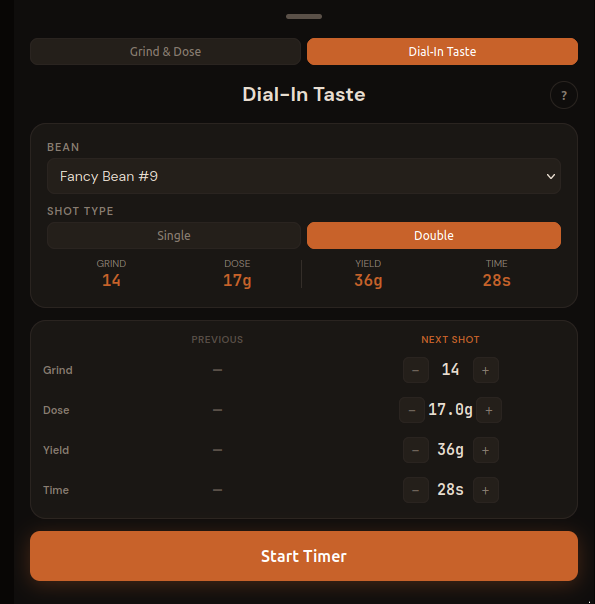
After saving your bean from Grind & Dose, the app automatically opens the Dial-In Taste page with your bean already selected. Note these values match those from the Grind & Dose results. The Plan page shows two columns: PREVIOUS (empty on shot #1) and NEXT SHOT (pre-filled from your bean profile).
If you wish to adjust the plan feel free to change the Next Shot values. NOTE: The time will pre-fill the timer as the target time.
The Dial-In tab is designed for iterative sessions. You pull, rate, get guidance, then plan your next shot — all without leaving the tab. Your session shots are listed at the bottom so you can see the trend.
Don't click Start timer quite yet.
3.2 The Pull
Before tapping Start Timer, get everything ready:
- Machine is fully warmed up — most home machines need 15–20 minutes, some with a PID can be ready faster, but don't pull on a cold machine
- Portafilter is dosed, distributed, and tamped (see Before You Pull above)
- Scale is on the drip tray, zeroed, with your cup placed on it
- You're positioned to lock the portafilter, start the machine, and tap the app in quick succession
Tap Start Timer the moment the machine starts and espresso begins moving toward the cup. The app is timing your extraction from that point, so try to be consistent.
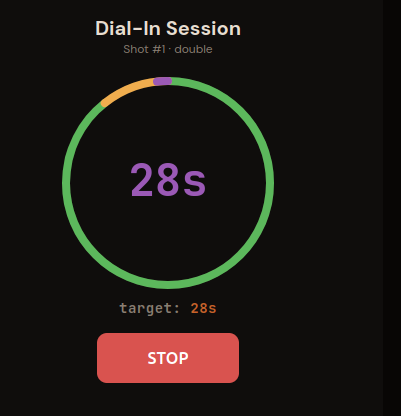
The time is shown and the circular timer fills as the shot runs. One full circle is the "time" from the next shot column. That is the target time. The color tells you where you are relative to your target:
- Green — extraction is building, you're on track
- Yellow — within 3 seconds of target, watch the scale
- Purple flash — you hit your target time exactly
- Red + "+Ns" — you've gone over; stop if yield is there, or let it run if flow is still fast and thin
Watch your scale, not just the timer. Stop the machine — and tap STOP in the app — when your yield hits the target weight (36g in this case). Most setups have a little drip-through after you cut the flow, so stop the machine 1–2g early and let it drip to target. When yield and time both land close to target on the same shot, you're (probably) in a good place. The timer is really just a rough guide the weight is the important part.
3.3 Rating the Shot and Getting Guidance
 ##### Reading Your Shot
TASTE What does sour actually taste like? Think lemon juice, unripe green apple, or a sharp vinegar bite — a brightness that's edgy rather than pleasant. In espresso it shows as a thin, puckering acidity that hits the sides of your tongue and fades fast, with little sweetness behind it. If your first instinct is to reach for sugar, the shot is probably sour.
What about bitter? Think the inside of a walnut shell, unsweetened dark chocolate, or espresso left sitting in the cup for five minutes — a harsh, drying sensation at the back of the throat that lingers and crowds out everything else. A little bitterness is normal and welcome in espresso; a lot of it means over-extraction.
BODY Watery body means the shot is thin and hollow — the coffee didn't have enough resistance to develop body. Muddy usually means water found an easy path through the puck (channeling) and pulled uneven extraction. Good body is full without being heavy. A balanced shot has both in proportion: a bright, pleasant acidity up front, sweetness in the middle, a clean finish. You'll know it when you taste it — it's the one where you don't want to put the cup down.
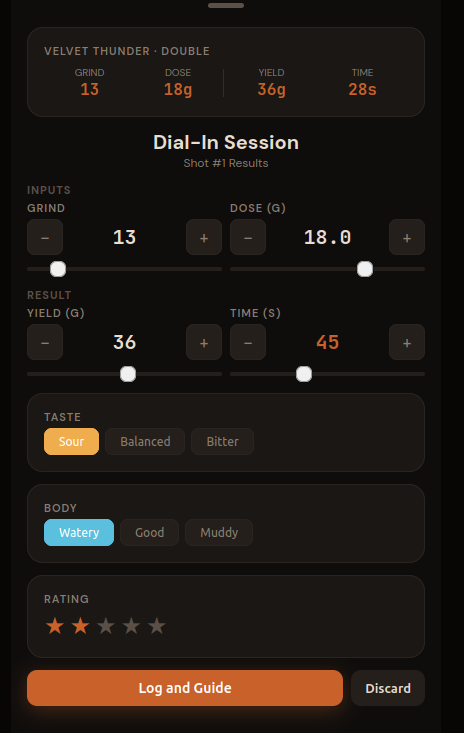
Recording the Result
After stopping, the Results page appears. Note that the actual time you click stop is recorded under time. Verify your actual dose, yield, and time - adjust as needed. Then select your Taste and Body ratings.
Once you click Log and Guide you will be returned to the Plan page. If needed you can Discard the data and it will not be saved and you can try again.
Add a star rating (1–5) and tap Log and Guide.
3.4 Adjusting for Shot #2
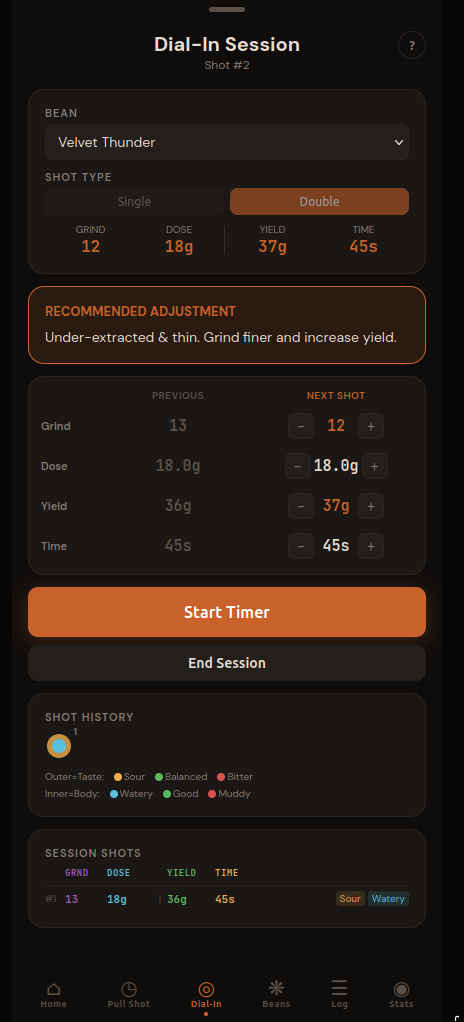
Back on the Plan page, you'll first notice the Guidance Card appears (Recommended Adjustment). It maps your taste + body combination to a specific recommendation. In this case, Sour + Watery means under-extraction across the board — the remedy is to grind finer and extend the yield.
You'll see the PREVIOUS column now filled with shot #1's values. The NEXT SHOT column starts from the same values so you can make targeted adjustments. Changed values highlight in orange so it's obvious what's different.
Following the guidance: The app adjusted grind finer (13 → 12) and nudge yield up (36g → 38g). If you want to do something different, just change the values.
"But you said change 1 only thing at a time and the app made 2 changes!" Yes, the adjustment goals are pointing out that you have 2 problems to address and giving you both solutions. If you are feeling reckless (you rebel you) you can do both at once but you may not know what caused the next result. In order to follow the advice of changing only 1 thing at a time, you just need to pick one to work on first and undo the other one. I'd recommend working on the grind size first which affects watery vs muddy. Just undo the one you do not want to work on (e.g. Yield) by making the Next column match the Previous column.
Load and ready your equipment and click Tap Start Timer and pull shot #2.
Repeat: Plan your next shot, pull, rate, get guidance, adjust — until you hit Balanced + Good. Most beans dial in within 2–4 shots. A particularly tricky grinder or a very light roast might take more. The session shots listed at the bottom of the Dial-In tab, and the trend chart that appears after two shots, help you see whether you're converging or drifting.
3.5 Dialed In
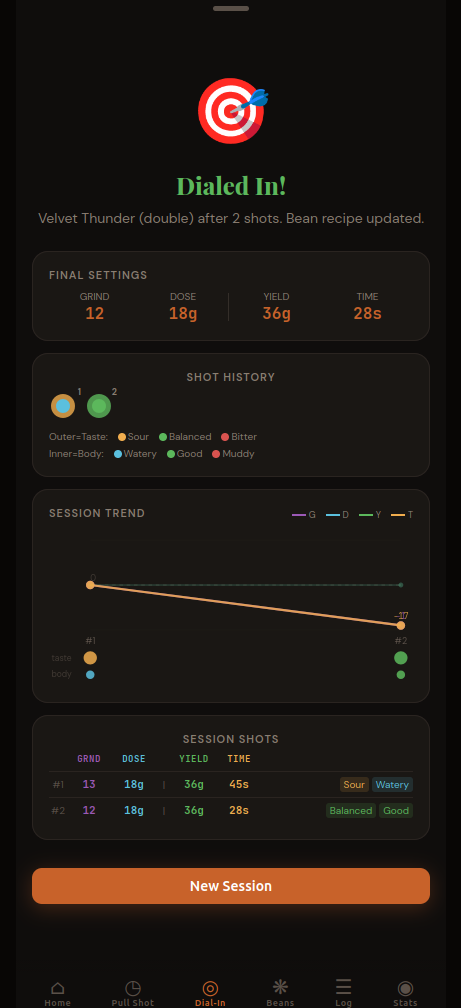
When you reach a Balanced taste and Good body, PullPerfect declares the session complete. The 🎯 Dialed In screen shows your final settings, the session shot log, and a trend chart showing how each variable moved across shots.
Your bean profile is automatically updated with the dialed-in values. Every future Pull Shot with this bean will start from these numbers.
Part 3: More
Once you understand the quickstart flow above, here are the other features.
4. Manage Beans
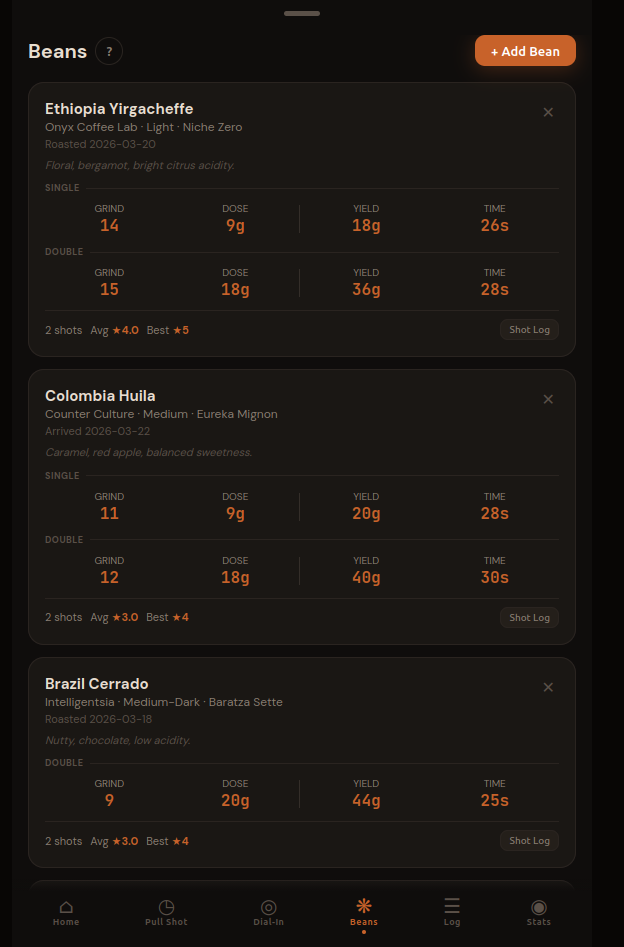 The beans tab allows you to see and manage your existing beans or add new ones.
**Click on the Bean's card to edit** or click "**+ Add Bean**" to create a new bean.
The beans tab allows you to see and manage your existing beans or add new ones.
**Click on the Bean's card to edit** or click "**+ Add Bean**" to create a new bean.
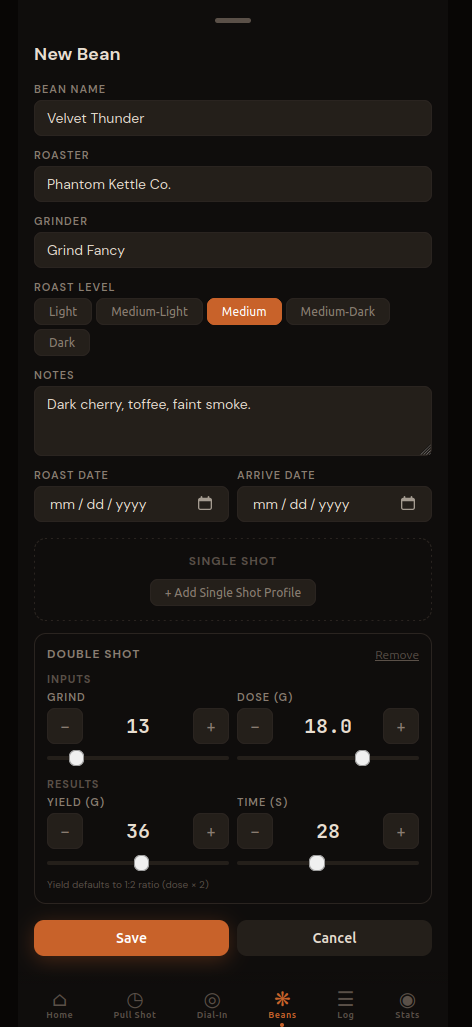
Fill in the name, roaster, roast level, and your grinder. Add tasting notes if you have them from the bag — they're useful context when you're dialing in and the flavor doesn't match what you expected. (The bean name field has autocomplete that remembers your past beans, handy once you're on your third bag of the same roast.)
(Optional) Then add a Double Shot Profile. For a new bag where you're not sure yet, the standard starting point is a good bet:
- Grind: 13 (adjust to whatever produces a 25–30s shot on your setup)
- Dose: 18g
- Yield: 36g
- Time: 28s
When you change dose on a new bean, yield auto-fills to double (the 1:2 golden ratio). Tap Save.
After saving, the bean card shows your profile at a glance. The 2×2 grid — G (grind), D (dose), Y (yield), T (time) — is the shorthand you'll reference constantly. Shot stats (shot count, average rating, best rating) appear once you start logging.
5. Daily Pulls with the Timer Tab
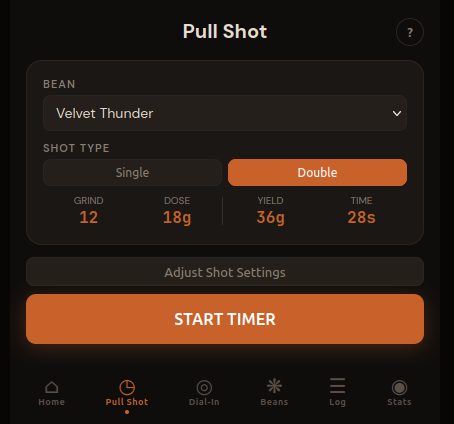
Once a bean is dialed in, switch to the Pull Shot tab for your daily pulls. Select your bean, verify the settings match what you actually ground, and hit START TIMER. After the shot you have two choices: Log Only (saves the shot to your history) or Update Bean (saves the shot and updates your bean profile with any tweaked values — useful if you made a adjustment and want to use them next time). Tap ✕ to discard without logging.
The "Adjust Shot Settings" toggle lets you tweak without losing your saved profile — useful when you've let beans rest a few more days and want to explore a half-step.
6. The Shot Log

The Log tab is your full history. Filter by taste, body, type, rating, or bean. Multi-select to delete experimental shots. Export to CSV if you want to analyze in a spreadsheet.
The date and time on each card let you correlate shots with real-world variables — a fresh bag vs. one that's been open two weeks, morning vs. afternoon machine warm-up, etc.
7. Stats at a Glance
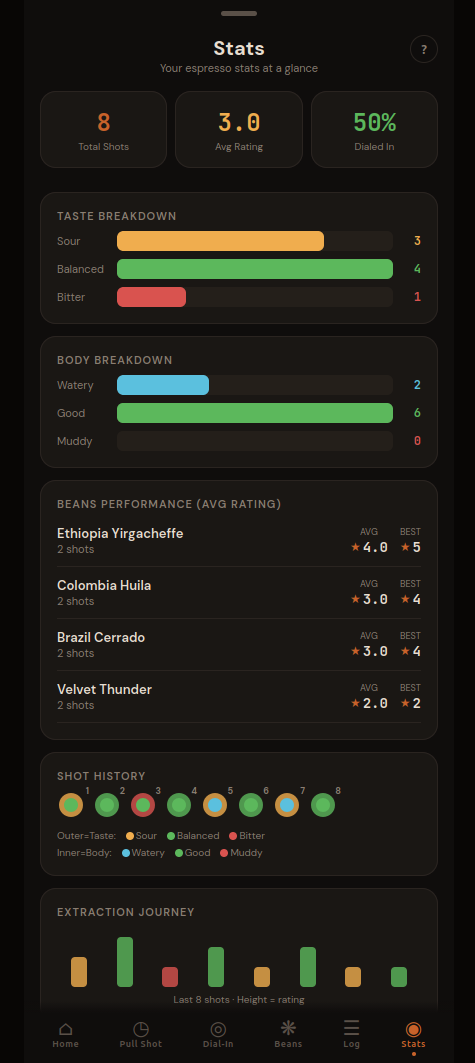
The Stats tab gives you a quick read on your overall extraction success rate. The Dialed In % is the share of Balanced + Good shots — your north star metric. The taste and body breakdown charts show whether you're consistently running sour (grind needs to go finer) or bitter (coarser) across all your beans.
The Extraction Journey at the bottom plots your last 20 shots as bars: green when you hit balanced + good, colored by taste otherwise. A good dial-in session shows a clear trend toward green.
A Few More Tips
Bean freshness matters. Beans roasted in the last 4–14 days are generally in their sweet spot — fresh enough to have good flavor, rested enough that the CO₂ from roasting has mostly off-gassed (excess CO₂ causes channeling and inconsistent extraction). Most specialty roasters print a roast date on the bag; PullPerfect's bean card has a roast date field for exactly this reason.
Single vs. double. PullPerfect tracks separate profiles for single (7g/14g) and double (18g/36g) shots. If you pull both, set up both profiles — the grind size that works for your double may need a click or two of adjustment for a single.
Don't throw away your bad shots. Log them, rate them low, and let the Stats tab accumulate. After a few bags you'll start to see patterns — whether you consistently run sour on new bags, or whether your Friday morning shots are always worse than your weekend ones. That's the data that actually helps you improve.
Wrapping Up
Espresso dial-in is a skill, not a formula. The variables interact, your palate adapts, and each bag of beans is slightly different. The goal isn't to find one perfect number — it's to build a feedback loop where you pull, taste, adjust, and record.
PullPerfect is built around that loop. Your bean profiles store what worked. Your log captures what you tried. Your stats show where you tend to drift. The more shots you track, the faster you'll dial in your next bag.
PullPerfect is a free, espresso tracking app. No account required, data stays on your device.